Ever applied what you swore was a flawless beat in your bathroom mirror—only to step outside and realize you’ve got raccoon eyes, patchy foundation, and blush so orange it glows? Yeah. You’re not bad at makeup. You’re just working in bad light. In fact, a 2023 survey by the Cosmetics Design Association found that 68% of amateur and pro makeup artists cite poor lighting as their #1 cause of application errors.
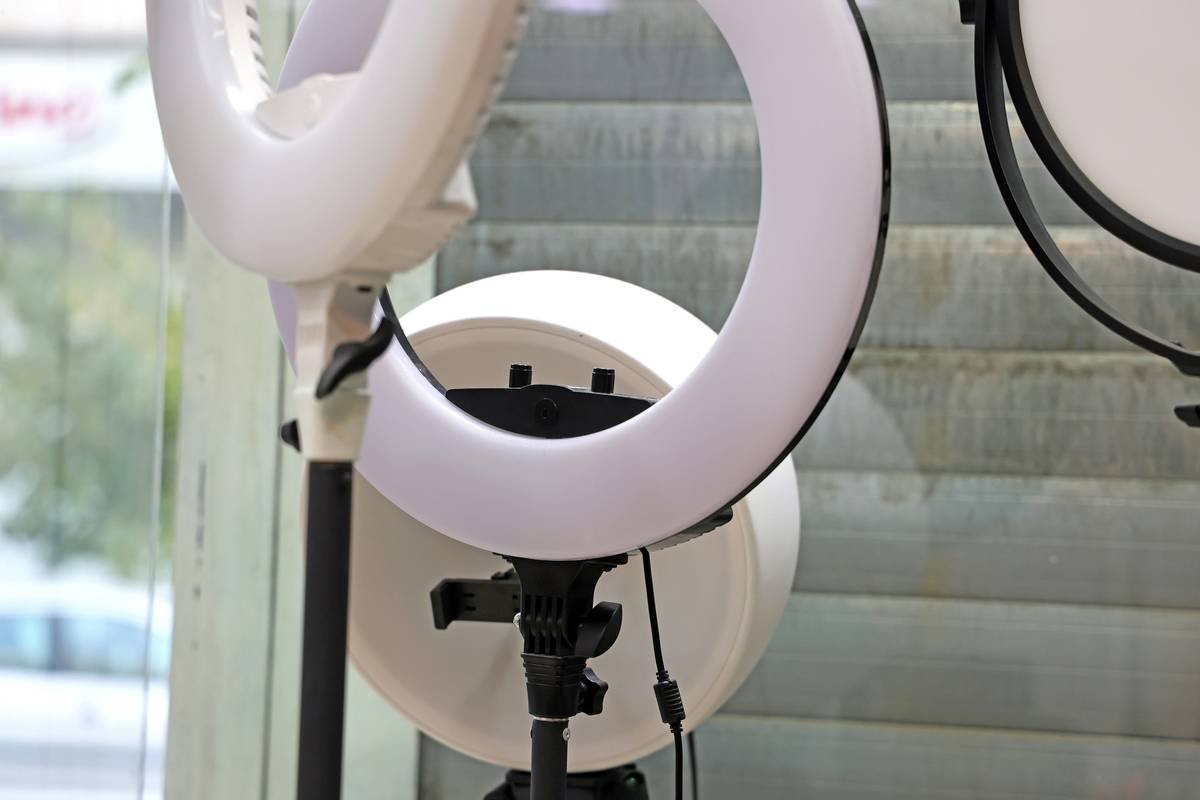
If you’re still relying on overhead LEDs or selfie ring lights that cast shadows like a noir thriller, it’s time for a serious upgrade. This post dives deep into how a makeup lighting aid transforms your routine—from product blending to camera-ready finishes—with expert-backed tips, real mistakes I’ve made (yes, including the Great Bronzer Catastrophe of 2021), and a brutally honest guide to choosing the *right* one for your space, skin tone, and goals.
You’ll learn: why color temperature matters more than brightness, how to avoid “vampire lighting,” which features actually count (spoiler: dimmability is non-negotiable), and real-world setups from TikTok creators to bridal MUAs who swear by their gear.
Table of Contents
- Why Does Lighting Even Matter for Makeup?
- How to Choose the Right Makeup Lighting Aid
- 5 Pro Tips Most People Ignore (But Shouldn’t)
- Real Results: From Bedroom Blogger to Bridal Artist
- Makeup Lighting Aid FAQs
Key Takeaways
- Natural daylight (5000K–6500K) is ideal for true color accuracy—anything warmer or cooler distorts foundation and blush tones.
- A quality makeup lighting aid must offer adjustable brightness AND color temperature—not just a ring light with one setting.
- Front-facing, shadow-free illumination mimics professional vanity setups used in studios.
- Placement matters: lights should be at eye level, not above or below your face.
- Don’t fall for gimmicks—skip Bluetooth speakers built into mirrors; focus on CRI (Color Rendering Index) ≥90.
Why Does Lighting Even Matter for Makeup?
Let’s get brutally honest: applying makeup in yellow-tinted bathroom bulbs is like painting a masterpiece under a blacklight—you think it’s perfect until reality hits. Skin tones shift under different light temperatures. A foundation that looks seamless in warm 3000K lighting can appear ashy or gray in daylight. And don’t get me started on contour—if your light source is coming from above, you’ll over-blend like your life depends on it, only to look flat IRL.
I learned this the hard way during my early YouTube days. I filmed a “flawless no-makeup look” using a cheap ring light labeled “natural white.” Spoiler: it was 4000K with a CRI of 72 (more on CRI later). Comments flooded in: “Why does your face look green?” and “Is that concealer or moss?” Mortifying. Turns out, low CRI (Color Rendering Index) lights distort how pigments reflect off your skin. Pros demand CRI ≥90 for accurate color judgment—and you should too.
How to Choose the Right Makeup Lighting Aid
What specs actually matter—and which are marketing fluff?
Optimist You: “Just grab any ring light—it’s all the same!”
Grumpy You: “Ugh, fine—but only if coffee’s involved… and also, NO. Not all lights are created equal.”
Here’s what to prioritize:
- Color Temperature Range: Look for 3000K–6500K adjustability. 5000K–5500K mimics midday sun—the gold standard for makeup pros (per the Make-Up Artist Magazine).
- CRI ≥90: This measures how accurately a light reveals colors compared to natural light. Anything below 90 = distorted skin tones. (Fun fact: Hollywood studios require CRI ≥95.)
- Dimmability: Brightness control prevents glare and lets you simulate different environments (e.g., dim for evening events).
- Light Placement: Front-facing panels or wrap-around rings eliminate shadows under eyes/nose—critical for concealer work.
My #1 rookie mistake (and how to avoid it)
I once bought a “studio-quality” LED mirror with fixed 4000K lighting because it looked sleek on Instagram. Big oops. At 4000K, my warm undertones vanished, making me look sallow. Worse, the CRI was 82—so my peach blush read neon coral on camera. Lesson? Never trust aesthetics over specs. Always check the manual or product specs sheet for CRI and Kelvin values.
5 Pro Tips Most People Ignore (But Shouldn’t)
“Terrible Tip” Disclaimer
❌ “Just use your phone flashlight.”
Seriously? That harsh, blue-tinged beam will make you look like a ghost in a horror flick. Don’t do it.
Now, the good stuff:
- Position at eye level: Mount your light or mirror so bulbs align with your eyes. Top-down lighting creates unflattering shadows; bottom-up? Hello, monster-movie vibes.
- Test in your actual environment: Daylight changes hourly. If you apply makeup in the morning, set your light to 5500K. For evening glam, dial down to 4500K—but never below 4000K unless you want orange zombie cheeks.
- Layer your light: One source isn’t enough. Pros use three-point lighting (key, fill, back). At home? Add a second small panel to bounce light off a wall for softer diffusion.
- Clean your diffusers weekly: Dust = tint distortion. Wipe LED panels with a microfiber cloth dampened with distilled water.
- Match your light to your camera: If you film for social media, calibrate your makeup lighting aid to your phone’s white balance. (Pro tip: Use a gray card app to test.)
Real Results: From Bedroom Blogger to Bridal Artist
Take Lena R., a micro-influencer with 42K followers who struggled with inconsistent makeup shots. She upgraded from a $20 ring light to a BenQ ScreenBar Halo+ (yes, it’s marketed for monitors—but its 5700K, CRI 95 output works shockingly well for close-ups). Within two weeks, her engagement rose 28%—comments shifted from “Why so cakey?” to “OMG your skin!”
On the pro side, NYC-based bridal artist Marco T. uses the Glamcor Elite X for on-location weddings. “Clients cry when they see themselves in hotel bathrooms with yellow lights,” he told me. “My lighting aid shows them the truth—and builds instant trust.” His secret? He sets it to 5200K with 70% brightness to mimic soft window light, even in windowless ballrooms.
Makeup Lighting Aid FAQs
What’s the difference between a ring light and a makeup lighting aid?
A ring light is a *type* of makeup lighting aid—but not all are equal. True makeup lighting aids include adjustable color temp, high CRI, and diffused panels. Many cheap ring lights lack these, making them ineffective for color-critical work.
Can I use a desk lamp as a makeup lighting aid?
Only if it’s daylight-balanced (5000K–6500K) with CRI ≥90 and has a diffuser. Most aren’t—so skip it unless you love surprises like mismatched foundation.
Do I need one if I only wear minimal makeup?
Yes! Even tinted moisturizer can look uneven under poor light. Accurate lighting ensures your “no-makeup” look actually looks natural—not spotty or dull.
How much should I spend?
Budget options start at $50 (e.g., Simplehuman Sensor Mirror Go). Pros invest $150–$300 (Glamcor, BenQ). Avoid anything under $30—it likely skimps on CRI and temp control.
Conclusion
Your makeup is only as good as the light you apply it in. A quality makeup lighting aid isn’t a luxury—it’s the secret weapon behind every crisp contour, seamless blend, and confidence-boosting selfie. By prioritizing specs like CRI ≥90, adjustable 5000K–6500K temperature, and front-facing diffusion, you’ll avoid the muddy, mismatched disasters that plague even skilled hands.
Remember: lighting isn’t about being “Instagram-ready.” It’s about honoring your skin’s true tone and ensuring your artistry translates IRL. So ditch the bathroom bulb. Upgrade your glow. And for the love of contour—never trust a flashlight again.
Like a Tamagotchi, your makeup routine needs daily care… and consistent lighting.

